

Lead flashing is installed by chasing a 25mm groove into a mortar joint, dressing the lead into the chase, securing it with lead wedges at 450mm centres, pointing the joint, and finishing with patination oil. Individual pieces should never exceed 1.5 metres in length, laps should be at least 100mm, and Code 4 lead suits most domestic chimney and abutment work.
Correctly installed lead lasts a very long time. Modern milled lead has a working life of roughly 80 to 100 years. Badly installed lead can fail in under five. The material is almost never the problem.
Why lead flashing fails
Almost every leaking flashing we are called out to in Ashford and across Kent fails for one of a small number of reasons:
- Pieces cut too long, so thermal movement tears the lead and splits it along a fold
- Inadequate turn-in, where the lead is pushed a few millimetres into a joint instead of a proper 25mm chase
- Laps too short, letting wind-driven rain track back between overlapping pieces
- Nothing holding it in place, with the lead relying on mortar or mastic alone
- The wrong code, either too thin to survive or too thick to dress properly
- Mastic used as a repair, sealing over a fault that then fails again from underneath
Notice what’s missing from that list: the lead itself. Almost every one of these failures comes down to who fitted it, not what was fitted. If you’re getting quotes for flashing work, our checklist on what to check before hiring a roofer covers the accreditation and warranty questions worth asking upfront.
Recognise any of these on your roof? A quick inspection can confirm before it becomes a bigger repair.
Book A Free InspectionWhy Choosing The Right Lead Code Matters
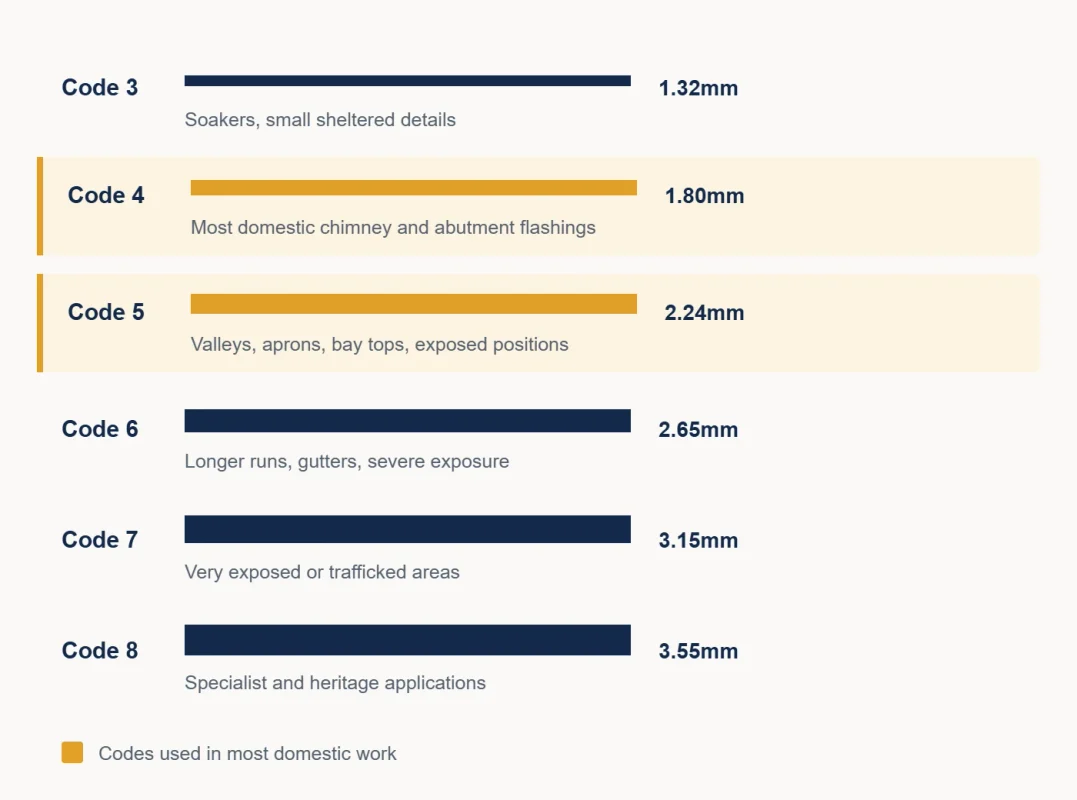
BS EN 12588 grades lead by code. The number refers to thickness and weight, not quality; thicker is not automatically better, and using too heavy a code on a small detail causes as many problems as using too light a one.
For a typical Ashford house, Code 4 covers most chimney and abutment flashings, with Code 3 for soakers beneath tiles and Code 5 where a chimney is wide, the property is exposed, or the flashing has a girth over about 150mm. Valleys generally want Code 5 or Code 6.
Code 3 is deliberately thin for soakers because a heavier code lifts the tiles or slates sitting over it.
Which Tools And materials Are Required
- Rolled lead sheet in the correct code
- Angle grinder with a diamond blade for chasing, or a raking tool
- Lead dresser, bossing stick and a chase wedge for shaping
- Aviation snips or a lead knife
- Lead wedges, cut and rolled from offcuts
- Stainless steel or copper clips for free edges
- Pointing trowel and mortar, or a lead-compatible sealant
- Patination oil and a soft cloth
- Gloves, eye protection, dust mask, knee pads
Note the absence of nails through the face of the flashing. Lead needs to move; fixing the free field of flashing to masonry causes fatigue splitting.
How To Install Lead Flashing Or Apron
This detail is where a roof meets a flat wall running across the slope.
1. Set out the chase
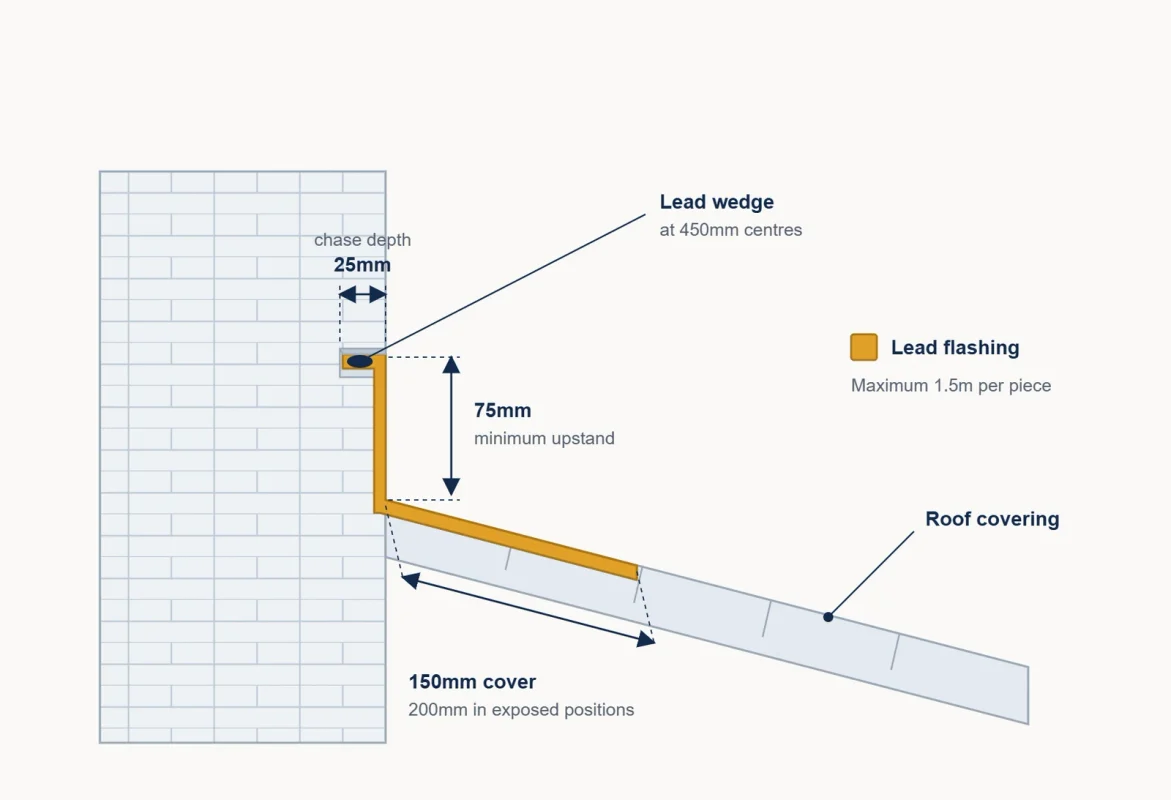
Mark a level line into a mortar joint above the roof line. Cut the chase to a 25mm depth. Going deeper compromises the masonry; going shallower gives the lead nothing to key into. Cut cleanly and avoid damaging the surrounding brick.
2. Cut the lead to length
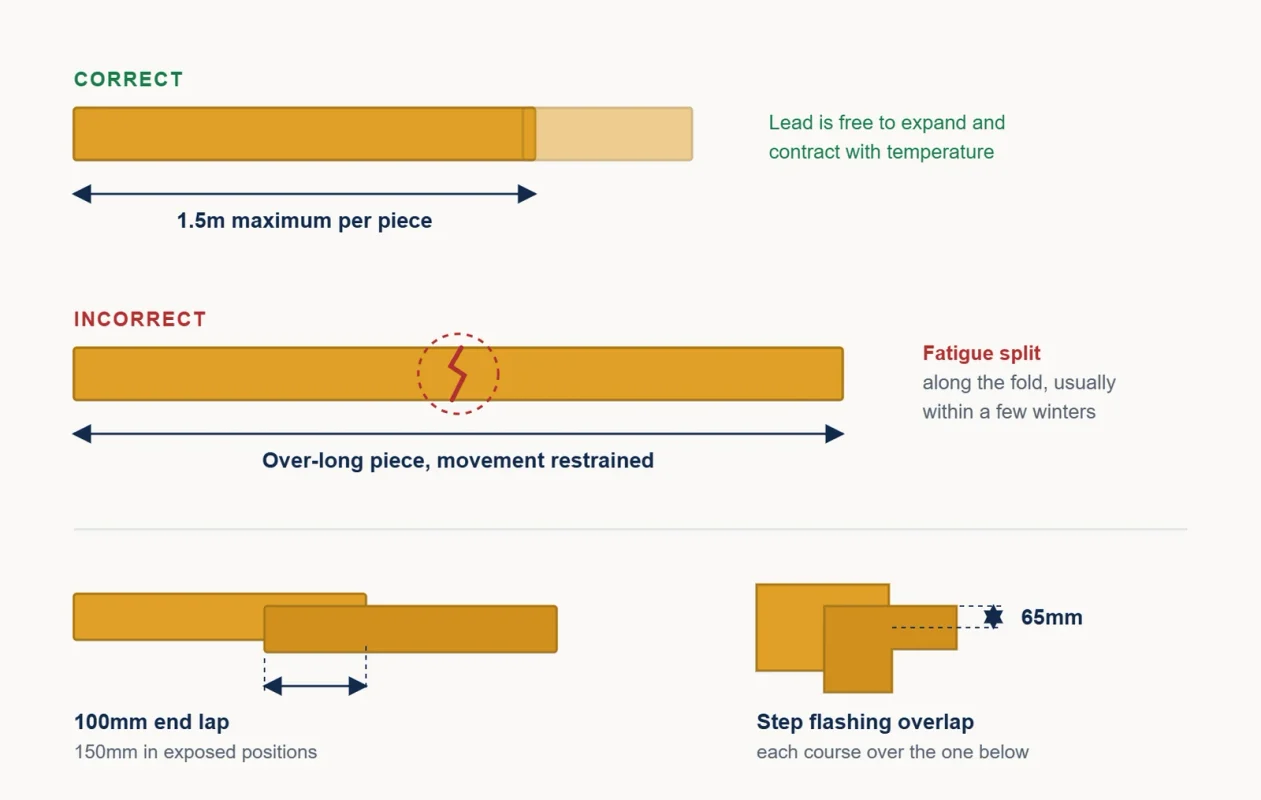
No single piece should exceed 1.5 metres. On asphalt, felt or single-ply coverings, the limit drops to 1 metre, because the lead is bonded along one side and moves differently from the covering above it.
3. Form the upstand and cover
The flashing needs a minimum 75mm upstand against the wall and should extend at least 150mm over the roof covering, increasing to 200mm in severe exposure. Fold a 25mm lip along the top edge to sit in the chase.
4. Dress the lead
Work from the centre outwards with wooden tools, easing the lead into shape rather than stretching it. Never work lead below about 5°C without warming it first; cold lead cracks along the folds. Dressing is where skill shows; over-worked lead thins and fails early.
5. Wedge and fix
Insert the folded lip fully into the chase and secure with lead wedges at 450mm centres. Roll wedges from lead offcuts, roughly 20 to 25mm wide, and make them just wider than the chase. Restrain free edges with stainless steel or copper clips. Fix enough to hold it, not so much that it cannot move.
6. Lap the joints
Where lengths meet, overlap by at least 100mm in sheltered positions and 150mm in exposed ones. This is the single most commonly botched dimension we see.
7. Point the chase
Use a lead-compatible mortar or sealant. Hard cement mortar cracks under movement and lets water behind the flashing.
8. Apply patination oil
Coat all new leadwork within 24 hours using a soft cloth. This prevents the white carbonate staining that runs down brickwork and gives the lead an even weathered finish. Oil the reverse of cut pieces too.
How To Flash A Chimney
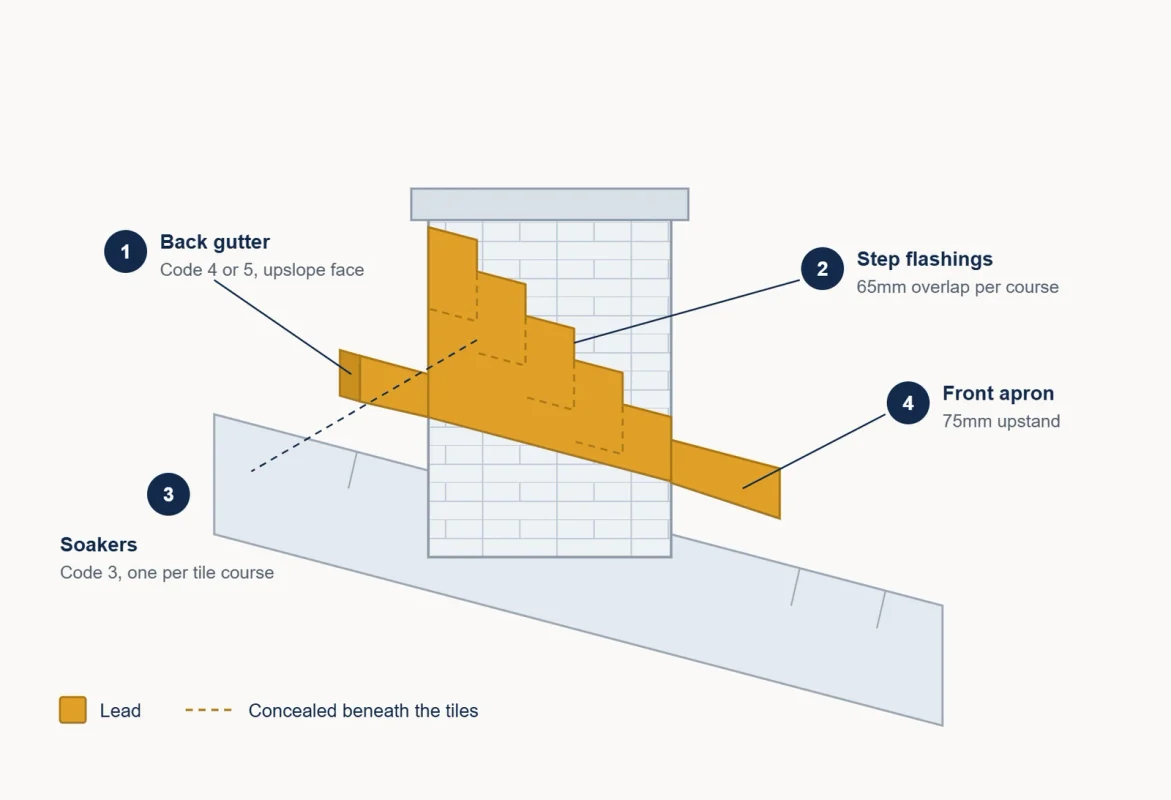
A chimney is not one flashing but a system of four, and they must work together.
Front apron
The lowest element, dressed over the tiles at the downslope face of the stack, with a minimum 75mm upstand into a chase.
Soakers
One per course of tiles or slates, in Code 3, tucked under the covering and turned up a minimum of 75mm against the stack. One soaker per course; never skip a course or double up. The type of roof covering above dictates the soaker size, plain tiles, pantiles and natural slate all need a different lap.
Step flashings
Cut to follow the brick courses up each cheek, overlapping the soakers. Each step should overlap the course below by at least 65mm. Keep the chase lines straight and parallel; wandering steps are the clearest sign of a rushed job.
Back gutter
The detail at the upslope face, in Code 4 or 5, is formed to carry water around the stack and discharge cleanly onto the roof at both sides. This is the hardest part of the job and the most common point of failure on older Kent properties.
Get any one of the four wrong and the chimney leaks regardless of how good the other three are.
Chimney Leaking? Get It Checked Properly.
A chimney is a four-part system; get any one wrong, and it leaks, regardless of the rest.
View Lead Work ServicesWhat Is the 1.5 metre rule, And A Common Misunderstanding
You will see lead sold in 3 metre and 6 metre rolls, and occasionally read that “the maximum length of Code 5 lead is 6 metres”. That refers to the roll, not the installed piece.
Lead expands and contracts substantially with temperature. A long, restrained piece has nowhere to go, so it works against its own fixings until it splits, usually along a fold, usually invisibly, usually a couple of winters after installation.
1.5 metres per piece for flashings. 1 metre onto asphalt, felt or single ply. Any lead sheet laid to fall needs a minimum fall of 1:80.
Mistakes That Cause Leaks
- Mastic instead of a chase
A bead of sealant along the top of a flashing is a temporary repair being sold as a permanent one. It will fail.
- Nailing the flashing face
Restrains movement and guarantees fatigue splitting.
- Reusing old lead on a new roof
Work-hardened lead that has already served 60 years will not survive being re-dressed.
- Ignoring the soakers
Step flashings alone, with no soakers underneath, leak at every course.
- Skipping patination oil
Not a leak risk, but the resulting white staining down the brickwork is permanent and obvious.
- Working cold lead
Below roughly 5°C, lead cracks rather than bends.
Safety And Handling Lead
Working at height causes most roofing injuries, so proper access matters more than anything else: use scaffolding rather than a ladder for anything beyond a small repair, and avoid roof work in wet, icy, or windy conditions.
For anyone working with lead commercially, this is a regulated activity, not just good practice. The HSE’s guidance on working safely with lead sets out the employer’s duties under the Control of Lead at Work Regulations 2002, and its categories for significant lead exposure explicitly include work with pipes and flashing. Those regulations are currently under review; the HSE has consulted on updating blood lead exposure thresholds for the first time in over twenty years, so the requirements may tighten.
When To Call A Roofer
An experienced, confident DIYer can fit a straightforward apron flashing on a low single-storey extension. That is the honest answer.
What we would not recommend tackling yourself:
- Anything on a chimney
The four-part system, especially the back gutter, takes real practice to form.
- Valleys
High water volume, unforgiving detailing.
- Anything above single storey
The access risk outweighs the saving.
- Heritage or listed properties
Wrong detailing here creates a planning problem and a leak.
- Any roof you cannot get safe, stable access to
Lead is also expensive enough that a botched attempt often costs more than the original quote once the material is written off. Our 2026 roof repair price guide sets out what flashing work typically runs to.
If your job falls into any of the above, this is exactly the work our team does day in, day out.
See Lead Work Services In Ashford →Leadwork In Ashford And Across Kent
At Hibbs Roofing & Building, we carry out leadwork across Ashford and the surrounding Kent villages, chimney flashings, valleys, bay tops, dormers and abutment details, on everything from post-war semis to period properties.
Spotted A Roofing Issue?
Get A Free, No-Obligation Inspection
From Hibbs Roofing and Building Ltd, serving Ashford and the surrounding Kent area.
Get A Free Quote →Tony Hibbs has been working on Kent roofs for 25 years, and that experience shows most in leadwork. If you have staining on a chimney breast, a damp patch on an upstairs ceiling after driving rain, or flashing that has clearly been patched with mastic, get in touch, and we will take a proper look.
Related Articles
Frequently Asked Questions
What is the correct chase depth for lead flashing?
A 25mm chase cut into the mortar joint is the standard depth. Going deeper compromises the masonry, while a shallower chase gives the lead nothing to key into properly.
What is the maximum length for a single piece of lead flashing?
1.5 metres for standard flashing work. This drops to 1 metre when the lead is bonded onto asphalt, felt, or single-ply roof coverings, since it moves differently from the covering beneath it.
What lead code should I use for a chimney flashing?
Code 4 covers most chimney and abutment flashings on a typical Ashford house. Use Code 3 for soakers beneath tiles, and Code 5 for wide chimneys, exposed properties, or flashings with a girth over about 150mm.
Why does lead flashing fail even though the material lasts 80 to 100 years?
Almost every failure comes down to installation, not the lead itself. Common causes include pieces cut too long, an inadequate turn-in, laps that are too short, and using mastic as a repair instead of a proper chase.
Can I install lead flashing myself?
A confident DIYer can manage a straightforward apron flashing on a low, single-storey extension. Chimneys, valleys, anything above single-storey, and heritage or listed properties should be left to a professional.
What is the minimum overlap (lap) between lead flashing pieces?
At least 100mm in sheltered positions and 150mm in exposed ones. Too-short laps are one of the most commonly botched details in flashing work.
Why is patination oil applied to new lead flashing?
Apply it within 24 hours of installation to prevent white carbonate staining from running down the brickwork, and to give the lead an even, weathered finish. Skipping it isn’t a leak risk, but the staining is permanent.
Can lead flashing be installed in cold weather?
No, not below roughly 5°C. Cold lead cracks rather than bends when dressed, so it needs to be warmed first in low temperatures.

Pingback: How Much Does Roof Repair Cost in UK? 2026 Price Guide
Pingback: Different Types Of Roofing Materials In Ashford - Hibbs
Pingback: How to Choose the Right Roofing Company: Essential Tips
Pingback: Types Of Roofs In The UK: A Simple Guide
Pingback: How Much Does Lead Flashing Cost in the UK? (2026)