

A roof felt repair from inside the loft works for small holes and tears, as long as the surrounding felt is dry and flexible and the tiles above are sound. Clean the area, cut a patch at least 100 mm larger than the damage on all sides, bond it with the right adhesive, and seal the edges. Treat it as a stopgap until you check the roof from outside.
You go up into the loft on a bright afternoon, switch the torch off and spot tiny dots of daylight where there shouldn’t be any. Or you find a damp patch on the loft insulation after a night of heavy rain. Either way, the same thought follows: can I sort this from up here without climbing onto the roof?
Often, yes. Leaks across Ashford and Kent often start with something as small as a tear in the felt, and Hibbs Roofing and Building Ltd can tell you quickly whether it’s a job for the loft or the roof. This guide explains how to repair roofing felt from indoors, what to use, and where DIY stops being the sensible choice.
Can You Repair Roof Felt From Inside the Loft?
You can repair roofing felt from inside the loft when the damage is small and easy to reach. You can’t fix everything from there. The felt is a thin layer under your tiles, so anything involving the tiles, the roof edge or a large area of failed material needs access from outside.
Older homes usually have thick black bitumen felt, which keeps water out but doesn’t let air through. Newer roofs tend to have a breathable membrane that lets damp air escape from the loft. Which one you have decides the adhesive you buy, and the steps below flag where that matters.
| Usually fixable from inside | Needs a roofer outside |
|---|---|
| Pinholes and small tears you can reach easily | Tears near the eaves, where the felt meets the gutter |
| A short split along a rafter | Felt crumbling or sagging over a wide area |
| A lifted overlap with sound felt around it | Broken, slipped or missing tiles above |
| Small gaps left by old fixings | Rotten battens or rafters underneath |
If your damage sits in the right-hand column, it’s best not to wait for the next downpour. You can arrange a free survey, and we’ll find out where the water is getting in and what needs fixing.
How to Find the Damage Before You Touch Anything
If water is coming in right now, deal with that first: here’s how to fix a leaking roof (link needs to be added) in an emergency. Otherwise, work through these three checks.
The Daylight Test
Go up on a bright day, turn the lights off and give your eyes a minute to adjust. Pinpricks of light usually mean holes in the felt, while broad patches of light point to missing tiles. Mark each pinprick with a strip of masking tape on the rafter beside it so you can find it again with the torch on.
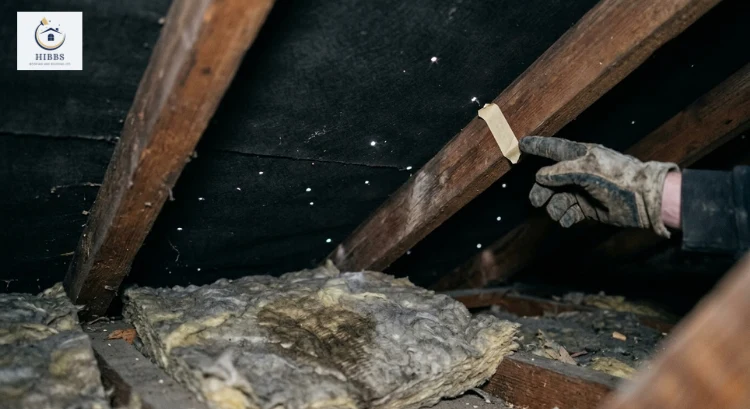
Trace the Water
Water doesn’t drip where it enters. It runs down the underside of the felt and along the battens first, so the real entry point is usually well above the stain. Follow stains and damp insulation upwards along the rafter until the trail runs out.
Check the Felt Is Still Sound
Press a clean patch of felt near the damage with a gloved finger. If it flexes and stays bonded, it will take a patch. If it cracks, flakes or tears at a touch, no adhesive will hold, so stop there.
Then look at the roof from the ground with binoculars. A cracked or slipped tile above the stain means the felt is only the messenger.
How to Repair Roof Felt From Inside the Loft: Step by Step
This is how to repair roof felt from inside the loft when the damage is small, and the surrounding felt is still in good shape. The same patch-and-seal method also works for repairing a felt roof on a flat roof or shed, but you do it from the weather side with safe access.
Gather these first:
- Head torch
- Gloves, goggles and a dust mask
- A kneeling board or plank to span the joists
- Sharp knife and stiff brush
- Clean cloths
- Cold-applied bitumen mastic or membrane adhesive
- A patch: an offcut of matching felt or membrane, or a self-adhesive repair patch
- A small roller or a flat piece of wood
Step 1: Make the Loft Safe
- Stand and kneel on the joists or a board across them, never on the plasterboard between.
- Use a head torch so both hands stay free, and keep well clear of cables.
- Wear gloves, goggles and a mask. Old insulation and felt dust irritate skin and lungs.
- Have someone at the bottom of the ladder.
- Never use a gas torch or naked flame in a loft. Torch-on felt is not an inside job.
- Homes built or refurbished before 2000 can contain asbestos in boards, lagging or water tanks. If anything looks suspect, leave it alone and read the HSE guidance on asbestos first.
Step 2: Clear and Dry the Area
Fold the insulation back just far enough to expose the damage, then brush off dust and loose grit and wipe the felt with a clean cloth. Adhesive won’t grip a dirty or wet surface, so wait for a dry spell if the felt is damp. A patch stuck over damp felt traps moisture against the timber.
Step 3: Trim Loose Edges
Use a sharp knife to cut away any frayed, curled or flaking felt around the damage, always cutting away from your hand. Stop as soon as you reach firm felt that is still bonded to the roof. Trimming for neatness only makes the hole bigger.
Step 4: Cut the Patch
Choose a patch that matches the existing felt, or use a self-adhesive repair patch. Cut it at least 100 mm (about 4 inches) bigger than the damage on every side, and round the corners so they can’t peel. A patch that only covers the hole is the first to lift.
Step 5: Bond the Patch
Spread an even coat of adhesive over the felt and the back of the patch, leaving no dry gaps. Bitumen felt takes cold-applied bitumen mastic or roofing adhesive, while a breathable membrane needs the adhesive or tape its manufacturer recommends. Press the patch down from the centre outwards, then roll it over firmly with a roller or a flat piece of wood.
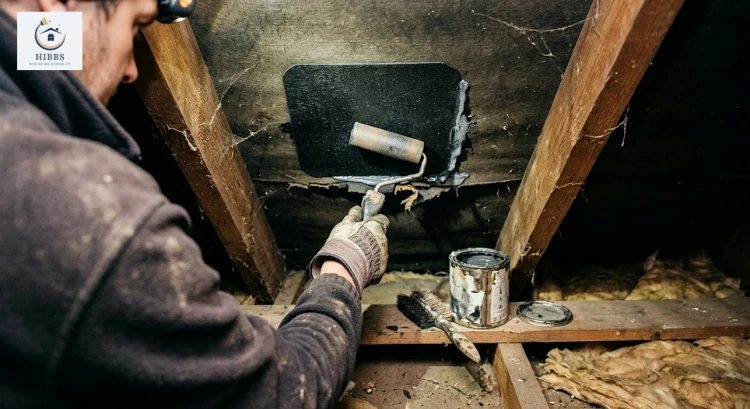
Step 6: Seal the Edges
The patch edge is where water will try to get in first. Run a neat, continuous bead of mastic around it, overlapping onto the original felt. Smooth it flat, paying extra attention to the corners.
Step 7: Let It Cure and Refit the Insulation
Leave the repair untouched for the drying time on the tin, which can be a full day in a cold loft. Once it has cured, lay the insulation back as it was, without squashing it. Finish with a quick torch check to make sure nothing has shifted.
Mistakes That Make Things Worse
- Relying on staples or nails to hold the patch. Each one is another hole to seal. Adhesive does the job.
- Poking a screwdriver upwards to find the hole. You’ll create new openings and can nudge tiles out of place.
- Filling gaps with expanding foam. It traps moisture, can block a breathable membrane and makes later repairs harder.
- Heaping on mastic. Thick blobs crack and collect dust. A smooth, even coat over a properly overlapped patch holds better.
- Stepping onto the roof for a quick look. Wet tiles and old felt are slippery. Use binoculars from the ground instead.
How to Prevent Roof Felt Damage in Future
Felt rarely fails without warning, and a few regular habits can stop the next tear before it starts. Most take minutes, not hours. Here’s what to build into your routine:
- Inspect the loft twice a year. Go up in autumn and again after any big storm, and look for stains, fresh daylight, and damp insulation.
- Replace slipped or cracked tiles quickly. They let water land directly on the felt, which was never designed to cope with it for long.
- Keep gutters flowing. An overflowing gutter can soak the felt at the eaves, so clear them before winter.
- Trim back overhanging branches. They scrape the tiles in the wind and drop debris that blocks gutters and valleys.
- Keep the eaves airways open. Insulation should never block the gaps at the roof edge. Airflow prevents condensation, which can look exactly like a leak. BS 5250 is the standard for managing moisture in buildings.
- Don’t store things against the felt. Boxes pressed against the rafters can rub the felt and block airflow.
- Act on signs of pests. Droppings, gnawing sounds or nesting material mean something is getting in, and felt is often what they chew through.
When an Inside Repair Isn’t Enough
Anything in the right-hand column of the first table needs a roofer. Beyond that, call one if:
- The leak returns after you’ve patched it
- Stains are appearing in several places, or spreading across a ceiling
- There’s a strong damp smell or mould in the loft
- You can’t reach or see the damage safely
- You’re not sure what you’re looking at
At Hibbs, every repair starts in the roof space. We trace the entry point first, then check the covering, flashings and valleys, because that’s where most leaks begin. Any work from outside, such as re-laying tiles, should follow BSI standard BS 5534 for slating and tiling.
Prefer a professional opinion first? Hibbs offers a free survey and a fixed written price on roof repairs in Ashford, or you can book a free roof survey directly.
Frequently Asked Questions
Can you put roof felt over existing felt without removing it?
Not on a pitched roof, because the felt sits under the tiles and battens, so new underlay means lifting the tiles. On a flat roof, it can work if the deck is sound, dry and free of blisters and the old surface is primed. For flat roof felt, we confirm at the survey whether an overlay qualifies. On sheds, stripping first is safer because it exposes hidden rot and prevents moisture from getting trapped.
How long does a loft patch last?
On sound, flexible felt, a neat patch can last from several months to a couple of years. Brittle felt, frost and strong winds shorten that.
Can I use duct tape on roof felt?
No. Duct tape doesn’t bond to bitumen, and its adhesive breaks down with the temperature swings in a loft. Use a roofing repair tape made for felt or membrane.
What happens if I leave a small tear in roof felt?
It rarely stays small. Water soaks the battens and rafters, which can rot over time, and wind can widen a torn edge in storms. Fixing it early is simpler than repairing timber later.
Does wet loft insulation need replacing after a leak?
Not always. Light dampness usually dries out once you fix the leak and the loft has airflow. Replace insulation that stays soaked, flattened or smelly, because it no longer insulates and can hold moisture against the timber.
