

To fix a leaking roof, locate the entry point (usually in the loft, by tracing water along the rafters), then repair or replace the damaged tile, flashing, or felt that caused it, and test the fix during the next rainfall. Most roof leaks are repaired within a single visit once the source is correctly identified.
At Hibbs Roofing and Building Ltd, we deal with roof leak repair for homes across Ashford and the surrounding Kent area, and the good news is that repairing a leaking roof is straightforward once the cause is known. In this guide, we’ll walk you through how to fix a leaking roof, the signs to watch for, the common causes, and the emergency steps you can take to protect your home until a professional arrives.
How to Fix a Leaking Roof (Step-by-Step)
So, how do you fix a leaking roof? It comes down to a clear process: locate the source, make the area safe, repair the damaged part, and then check the fix holds. Skipping straight to a patch-up without finding the real source is why many roof leak repair attempts don’t last. Here’s the process our team at Hibbs Roofing and Building Ltd follows from start to finish.
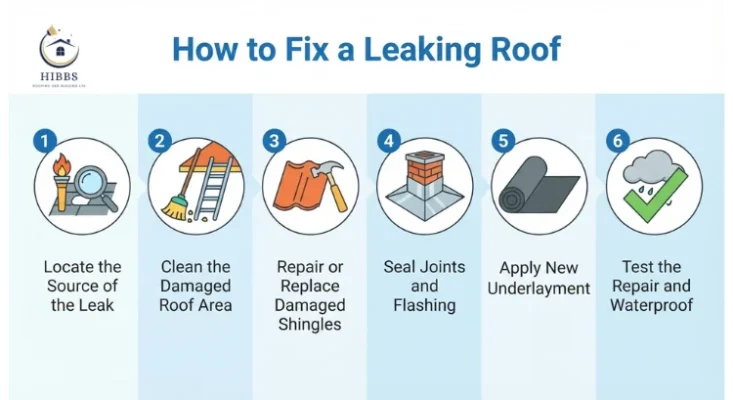
Step 1: Find the Source of the Leak
Trace the water back to its entry point, checking the loft first, since water often travels along timbers before dripping through the ceiling, farther from the actual leak. A torch and a dry day are usually enough to spot damp timber, staining, or daylight coming through a gap. Roofers often trace the trail upward from the drip itself, working along rafters and battens until they find the exact point where water is entering, since fixing the wrong spot is one of the main reasons a leaking roof repair fails.
Step 2: Clear the Area and Assess Access
Remove any debris, moss, or loose material around the affected spot so the damage is fully visible and safe to work on. This also means checking how the roof will be accessed safely, whether that’s a ladder, scaffold tower, or roof ladder, depending on the pitch and height involved. Clearing the area properly at this stage makes it much easier to spot secondary damage, such as rotten battens or a torn membrane, that might otherwise be missed.
Step 3: Repair or Replace Damaged Tiles
Any cracked, slipped, or missing tiles are removed and replaced to close off the most common entry point for water. This usually involves lifting the surrounding tiles slightly to slide the new one into place and securing it to the batten, matching the existing tile type and colour where possible. Neighbouring tiles are checked at the same time, since one damaged tile often means others nearby have started to fail too.
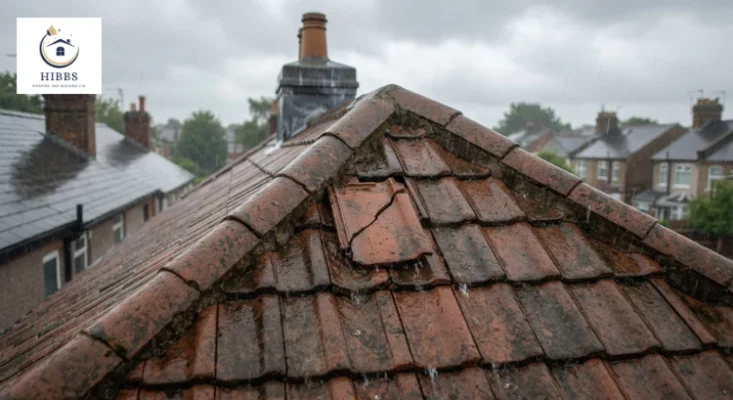
Step 4: Reseal or Replace Flashing
Old or cracked flashing around chimneys, valleys, and roof windows is resealed or replaced so water can no longer track in through the joints. This often means removing the old lead or flashing strip completely, cleaning the surface beneath, and dressing the new flashing tightly into the brickwork or joint to form a fully watertight seal, rather than just patching over the crack, in line with the standards set out by the Lead Sheet Advisory Service. Our Lead Work services in Ashford cover this in more detail if you’d like to see examples of the finish we aim for.
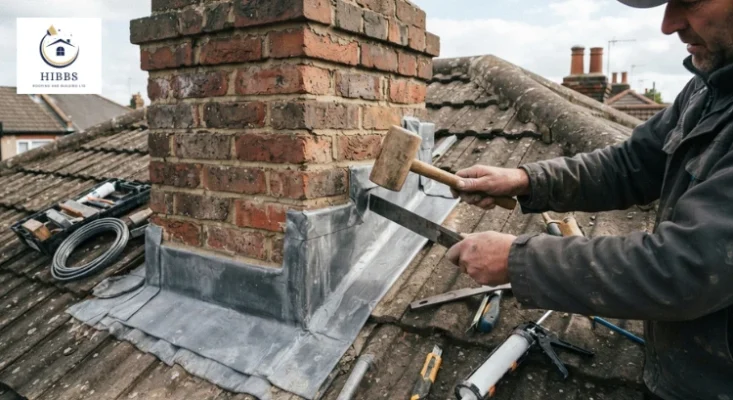
Step 5: Check and Repair Felt or Underlay
If the felt beneath the tiles has torn or perished, it’s patched or replaced so the roof has a solid backup barrier again. In older roofs, this can mean lifting a wider section of tiles to access enough felt to work with, rather than just the small area directly above the leak, since felt tends to deteriorate evenly with age rather than in one isolated spot.
Step 6: Test the Repair and Monitor
Once repaired, the area is checked during the next spell of rain or hosed down safely to confirm the leak has fully stopped. It’s also worth checking the loft again a few days later for any lingering damp smell or staining, since a slow leak can sometimes take a little longer to dry out, even after the source has been fully sealed.
What Are the Common Signs Your Roof Is Leaking?
Catching a leak early makes the repair faster and cheaper, so it’s worth knowing what to look out for before the damage spreads:
- Damp patches or staining on ceilings, usually brown or yellow-tinged rings that grow slightly after rain.
- A musty or damp smell in the loft, often the first sign, even before any visible staining appears.
- Daylight visible through the roof timbers, a clear indicator of a gap in the tiles or felt.
- Missing, cracked, or slipped tiles visible from ground level, worth a quick check with binoculars after high winds.
- Sagging or discoloured patches on the ceiling can indicate water has been pooling for a while.
- Mould growth around chimney breasts or roof windows, often linked to failing flashing rather than the roof covering itself.
If you notice any of these, it’s worth booking an inspection before the next spell of heavy rain rather than waiting for the leak to show up indoors.
What are the Common Causes of A Leaking Roof?
Before you can fix a leaking roof, it helps to understand why it started in the first place. Roof leaks rarely appear out of nowhere; they develop over time as small weaknesses in the roof structure allow water through. Weather, age, and poor maintenance are usually behind it. Knowing the cause also helps a roofer carry out the right roof leak repair the first time, rather than a quick fix that fails again, which is why our roofing services always start with a proper inspection.

Damaged or Missing Roof Tiles
Cracked, slipped, or missing tiles are one of the most common causes of a leaking roof. Once a tile moves out of place, rain can get straight through to the timber and felt underneath.
Cracked or Perished Flashing
Flashing seals the joints around chimneys, roof windows, and where two roof sections meet. When it cracks or lifts with age, water finds an easy route inside.
Blocked or Damaged Gutters
When gutters are clogged with leaves and debris, rainwater has nowhere to go. It backs up under the roofline and can seep into the roof structure and walls. Our uPVC Fascia & Guttering services cover repairs and replacements if this is the cause.
Ageing Roof Felt or Underlay
The felt layer beneath your tiles is your roof’s backup barrier. Once it becomes brittle or torn with age, it stops doing its job and water can pass straight through; see our guide on how long different roofing materials last for when replacement makes more sense than repair.
Condensation and Poor Ventilation
Not every leak comes from outside. Poor loft ventilation can trap moisture in the roof space, leading to damp patches that look like a leak but are actually condensation, as outlined in NHBC’s guidance on roof condensation.
Storm and Wind Damage
Strong wind and heavy rain can lift tiles, damage flashing, and force water into gaps that are normally watertight. This is one of the most common reasons for an emergency roof leak after bad weather.
Cracked Chimney Pointing
The mortar around a chimney can crack and crumble with age. Once gaps appear, rainwater tracks down the brickwork and into the roof space where the chimney meets the tiles.
Damaged Roof Valleys
A valley is where two roof slopes meet, and it carries a large volume of rainwater. If the lead or felt lining in a valley splits or corrodes, this quickly becomes one of the most common causes of a leaking roof.
Emergency Steps to Take When Your Roof Is Leaking
If you’ve noticed water coming through, acting fast can limit the damage while you arrange a repair. These emergency steps for a leaking roof are about protecting your home and family first, not carrying out the roof leak repair yourself; that part is best left to a qualified roofer.
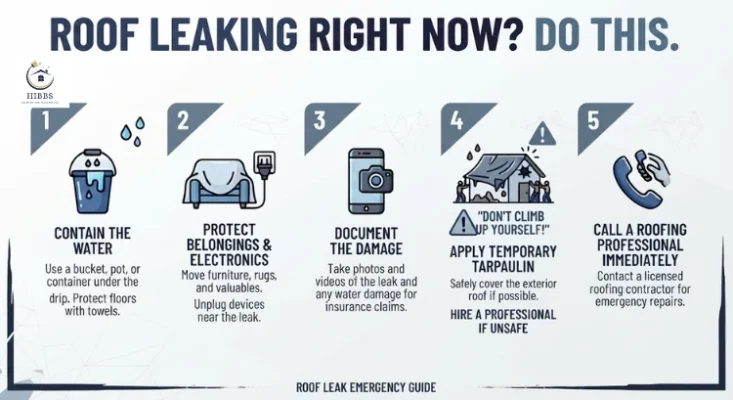
Contain the Water Indoors
Place a bucket or container under the leak and lay towels around it to stop water spreading across floors and furniture.
Move Belongings and Cut Off Electrics if Needed
Move furniture and valuables away from the area, and switch off the electrics nearby if water is near sockets or light fittings.
Photograph the Damage
Take clear photos of the leak and any damage for your insurance claim and to show the roofer before they arrive.
Cover the Roof Temporarily (if Safe)
A tarpaulin can reduce further water ingress, but never attempt roof access yourself; leave this to a professional. Working at height is one of the leading causes of serious injury in the UK, as explained in the HSE’s official guidance, so it’s never worth the risk of climbing up yourself.
Call a Professional Roofer Immediately
Calling an experienced roofer straight away is the safest way to get a lasting fix rather than a temporary patch. You can contact our team directly for a fast response.
Tips to Prevent a Leaking Roof
Once a leak has been repaired, the next priority is preventing the same problem from recurring, so you don’t need another roof leak repair any time soon. Most future roof leaks can be avoided with a bit of routine upkeep, rather than waiting for water to appear again. None of these steps takes long, but together they make a real difference to how long your roof stays watertight.
- Book regular roof inspections: catch small issues before they turn into an emergency roof leak.
- Keep gutters clear: ensure rainwater flows away rather than backing up under the tiles.
- Repair damaged tiles promptly: stops water finding a way in during the next spell of rain.
- Check flashing periodically: this is one of the first places a leak tends to start.
- Improve loft ventilation: reduces condensation-related damp that can mimic a genuine leak.
- Trim overhanging branches and clear moss: keeps debris off the tiles and stops damp, shaded patches where moss takes hold.
Conclusion
A leaking roof is one of those problems that only gets worse the longer it’s left. What starts as a small drip in the loft can quickly turn into damp ceilings, damaged insulation, and costly internal repairs if the source isn’t found and fixed properly. Acting early always saves you time, money, and stress in the long run.
As expert roofers in Ashford, we’re on hand to carry out a full inspection and get your roof watertight again, whether it’s a single slipped tile or a more serious leak. If you’re dealing with a leak right now in Ashford or the wider Kent area, don’t wait for it to spread; get in touch with our team for a fast, reliable roof leak repair, or see our reviews and location to find us nearby.
FAQs
Can a leaking roof quickly damage my home?
Yes. Water from a leaking roof can spread to ceilings, walls, and insulation within days of the first leak, so early inspection prevents minor damage from becoming a much larger repair.
Does a leaking roof always mean the whole roof needs replacing?
No. In most cases, only the damaged section, such as a tile, a flashing joint, or a small area of felt, needs repair rather than the entire roof.
Does home insurance usually cover roof leak repairs?
Often, yes. Most UK home insurance policies cover sudden leak damage from storms or accidents, but gradual wear and tear is typically excluded, so check your specific policy wording.
Will a small roof leak go away on its own?
No. Roof leaks do not self-repair and typically worsen over time, especially with continued rain or wind exposure, so even a small leak needs to be addressed.
Can a leaking roof affect my home’s structure over time?
Yes. Left untreated, trapped moisture from a roof leak can weaken roof timbers and ceiling joists, which is why early repair prevents structural damage rather than just cosmetic staining.
Can you fix a leaking roof from the inside?
Only temporarily. Small internal fixes like sealing a loft gap or patching felt can reduce water ingress short term, but a lasting repair requires fixing the external damage that caused the leak.
